
From Your Phone to Your Feed: Video Tips for Every Type of Creator
Aug 12, 2026
From Your Phone to Your Feed: Video Tips for Every Type of Creator
Author: Kelsey Diane Barber
Video Tips That Will Take Your Reels to the Next Level
Video content is one of the most powerful tools available to you on social media right now, but even the best message can fall flat if the video quality is working against you. Shaky footage, poor lighting, muffled audio, and blurry visuals can make it incredibly hard for your audience to connect with what you're sharing (even if your message is great)!
The good news is that you don't need a professional camera setup or a fancy studio to create great video content. What you do need are the right habits, which start before you ever hit record.
Before You Even Hit Record, Get Your Settings Right
One of the most common problems we see is a video recorded in low-quality settings to begin with. When you add the compression that naturally happens when sending files, what started as okay footage becomes really difficult to work with. The fix is simple: always record at the highest quality your phone allows. You can always compress a file later, but you can’t recover quality that was never there in the first place.
Here's how to make sure your phone is set up for success before you film a single second of footage.
iPhone Camera Settings
Your iPhone is capable of recording stunning video, but only if the settings are configured correctly. Here's what to check:
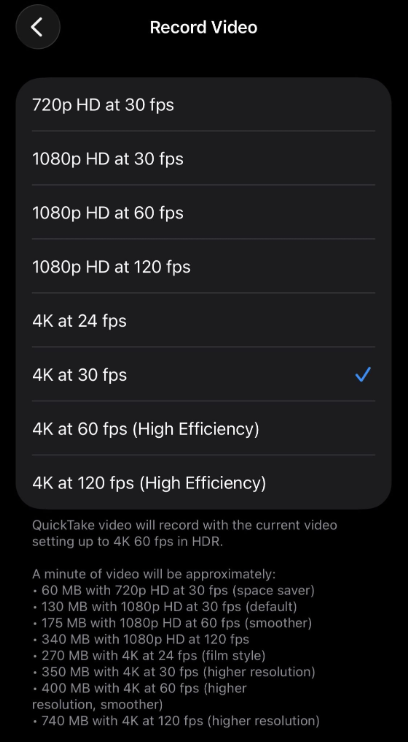
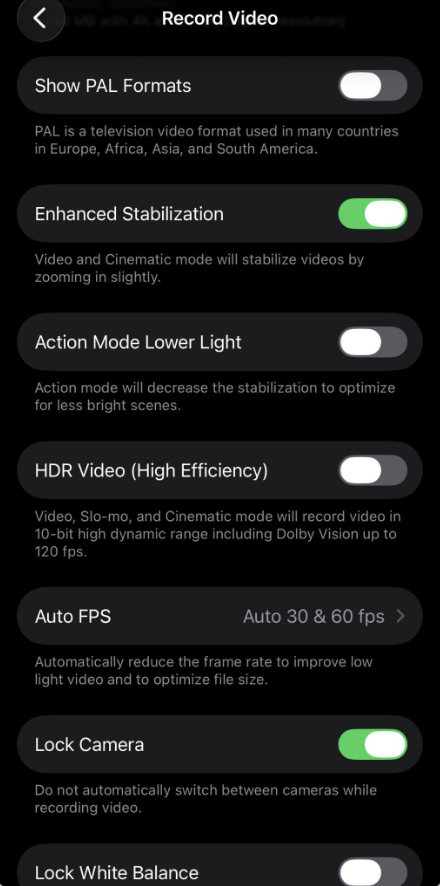
To find these settings, go to Settings -> Camera -> Record Video
- Set your resolution to 4K at 30fps for the best overall quality or at 60fps if you plan to slow the footage down later.
- Enhanced Stabilization on to smooth out jitters and slight hand shaking
- Turn off HDR video for richer, balanced color
- Lock Camera on to stop phone from switching camera lenses while zooming or moving.
- Lock your exposure and focus before you start recording. Simply tap and hold on your subject in the camera app until you see the AE/AF Lock banner appear at the top of the screen. This prevents your camera from constantly readjusting mid-clip.
- Turn off Live Photo mode before recording. It can interfere with clean video capture and create issues when editing later.
- Check your storage before you film. When your iPhone is running low on storage, it will automatically compress your footage to save space. Make sure you have enough room before your next filming session.
Here are the settings our video editor uses on her iPhone Camera
Android Camera Settings
Doing some research, this is what our video editor found to be ideal for those of you using Android devices:
- Set your resolution to 4K or the highest available option in your camera app settings.
- Turn on video stabilization if your device offers it. This helps reduce shakiness, especially if you're filming handheld.
- Use Pro or Manual mode if you want more control over your exposure and white balance. It sounds intimidating but makes a real difference in consistent lighting.
- Avoid using built-in beauty or filter modes in your camera app. These modes are baked directly into the footage and reduce overall quality in ways that can't be undone in editing.
How to Send Videos Without Losing Quality
Recording in high quality is only half the battle; how you send your footage (when someone else is editing it) matters just as much. This is one of the biggest pain points we see at Stratos, and it's an easy fix once you know what to avoid.
When you send a video via a text message or a social media DM, the platform automatically compresses the file. That compression can significantly reduce the quality of your footage, often to the point where it's very difficult to edit into something polished. Even if your original video looked great, by the time it arrives through a text thread, it can look blurry, pixelated, or washed out.
What NOT to do:
- Send video files via iMessage or SMS text
- Send footage directly through Instagram or Facebook DMs
- Upload raw video files as email attachments
The right way to send your videos:
Google Drive is our preferred method at Stratos and what we recommend for all clients sending us footage. Upload your video file to a Google Drive folder, then share the Google Drive link (or add your video editor as an editor to the folder). This preserves the original quality of your file and makes it easy for your video team to access and organize. When uploading, make sure you're sharing with the correct permissions so they can actually open/download it!
A few other great options if you're sending footage to collaborators or editors outside of Stratos:
- Dropbox is excellent for large files and maintains original quality
- WeTransfer is a great free option that requires no account for the recipient, as long as your file is less that 3GB.
No matter which method you use, do yourself (and your editor) a favor and name your files clearly. Something like Date_YourName_Topic (for example: 081026_KelseyDiane_VideoProject) makes it so much easier to stay organized, especially when you're sending multiple clips.
Tips for Recording Videos (and Sending to an Editor)
Following these tips will give you the best possible material to work with and make the editing process smoother (for you or your video editor), resulting in a better final product for you.
Film vertically. Reels are a vertical format (9:16 ratio), so all footage should be filmed with your phone upright. Horizontal footage can work in some cases, but vertical footage gives us the most flexibility in editing. If you have questions about which format to record your video, talk to your video editor about the project before recording, and let them give you the best options for your project.
Use your rear-facing camera. It might feel more natural to use your front-facing camera to see yourself, but your rear camera is significantly higher quality. If you can, set up your phone on a stand or tripod, frame your shot, and use a timer or Bluetooth remote to start recording. The difference in quality is noticeable.
Give yourself a buffer. Don't start talking the very second you hit record, and don't stop recording the moment you finish your last word. Give yourself a couple of seconds of buffer at the beginning and end of every clip. This makes editing significantly easier and helps us create cleaner cuts. This also applies if you are recording different thoughts in a single video. Pausing between ideas makes it easier to cut and splice things together and add transitions.
Editing Tip from Kelsey Diane: If you are sending a longer form video (3+ minutes), don’t hit stop and rerecord from the beginning if you fumble your words or make a mistake. Instead, take a pause (at least 5 seconds) and start over from the beginning of your thought. That will give the editor a clear place to cut the fumble out and restart the video. I’d rather do this than splice multiple video files together.
Think about your background. What's behind you in the frame tells a story about your brand. It doesn't need to be perfect, but it should be intentional. A clean, uncluttered background or a thoughtfully styled space will always look more professional than a messy room or a distracting backdrop.
Frame yourself intentionally. Before you start filming, glance at what's in the shot. Make sure your full head is visible at the top of the frame, and nothing important is being cut off at the bottom. A good rule of thumb: position your eyes roughly one-third of the way down from the top of the frame. Avoid standing too far back (you'll look small and disconnected) or too close (you'll feel overwhelming on screen). Find a comfortable middle ground where you're clearly visible and well-centered. If you plan to add captions to your video, please make sure there is enough space in the bottom ½-⅓ of the frame. That means making sure the background isn’t too busy (like a t-shirt with text on it).
Face your light source. Lighting can make or break a video. Natural light is completely free and incredibly flattering. Position yourself facing a window and let the natural light do the work. If you're filming in the evenings or in a space without great natural light, a ring light is one of the most affordable and impactful investments you can make for your content.
The simplest rule: whatever your light source is (a window, a lamp, a ring light), make sure it is in front of you, not behind you. Filming with a light source behind you will leave you looking dark and shadowy, which is very difficult to fix.
Mind your audio. Try to film in a quiet environment whenever possible. Background noise: fans, TVs, traffic, wind, etc. competes with your voice and can make audio hard to clean up. If you're filming outside, be especially mindful of wind noise. While your editor can remove some background noise, too much can be hard to remove without compromising the intended audio.
Editing Tip from Kelsey Diane: Using a microphone can be great for reducing background noise, especially if you plan to film in public/noisier spaces.
Stabilize your phone. Shaky footage is one of the fastest ways to lose a viewer's attention. Prop your phone against a stack of books or grab a phone stand/tripod, your future self and your content will thank you.
Batch your filming sessions. Instead of filming one video at a time, pick one day a week to film several videos in a single session. Same setup, same lighting, just change your shirt/outfit (or don’t). This allows you to knock out a week's worth of content in one focused block. It saves time, keeps your content consistent, and takes the pressure off of showing up to film every single day.
Send your raw footage, please don't add anything to it first. This is a big one. Please don't add filters, music, text, or stickers to your footage before sending it to your editor. Those elements get baked into the video, making editing so much harder. Send the clean, unedited clip and let your editing team handle the creative touches; that's what they're here for! If you have something you want to see added, just let them know.
More takes are always better. If you have multiple takes of the same clip, send them all. Having options gives our editors the flexibility to choose the best version or combine the strongest moments from each take into one great final product.
Done is better than perfect. This one is worth repeating. Confidence in front of the camera grows the more you do it. Don't let the pursuit of a perfect video stop you from posting at all. Your audience wants to hear from you, show up, even when it's not flawless.
Tools & Apps We Recommend
Once your footage is filmed and ready to go, these are the editing tools we recommend for creating polished, professional-looking Reels:
Edits (by Instagram) is a fantastic option for creators who want to stay within the Instagram ecosystem. It's intuitive, designed specifically with Reels in mind, and makes the jump from editing to posting seamless. If Instagram is your primary platform, this is a great place to start, and Kelsey Diane’s number-one-used app for editing reels for our clients.
Kelsey Diane’s Tip: When you find a reel on Instagram that you want to recreate, save the audio. It will automatically show up in your Edits saved audio, making your editing even simpler. Plus, you can post your edited video straight to Instagram from Edits!
CapCut is one of the most popular editing apps out there for good reason. It's packed with features: templates, auto-captions, transitions, effects, and more. Plus, it's accessible for both beginners and more advanced creators. If you're looking for one app that can do almost everything, CapCut is a strong choice.
Canva is a tool many of you are probably already using for your graphics and social media content, and its video tools are getting better every day. Canva is especially great for adding branded text overlays, graphics, and polished cover images to your videos. If brand consistency matters to you (and it should!), Canva makes it easy to keep everything looking cohesive.
Your Homework This Week
Now that you have the tools and the knowledge, here's your action plan:
- Check your camera settings: Don't wait until your next filming session. Open your camera settings right now and make sure you're recording at the highest quality available on your device.
- Set up Google Drive for sending footage. Whether you are sending your content to an editor or not, having a Google Drive set up for your footage makes it easier to access down the road (or on any device) and keeps your video quality clean.
- Download one of our recommended apps and spend a few minutes checking it out before your next filming session.
Great video content doesn't require a professional camera crew or a perfectly decorated studio. What it requires is some thoughtful intention: the right settings, habits, and a little bit of preparation before you hit record. Whether you're sending footage to our team at Stratos or posting your own Reels independently, these tips will make a real difference in the quality of your final product.
Small changes add up. Better settings mean better footage. Better footage means better content. And better content means more of the right people stopping to watch, engage, and take action.